

Raw Beauty Waiting to Be Discovered
Lake Cumberland is one of the largest lakes in the nation, spanning more than 65,000 acres and a reservoir large enough to cover the entire state with three inches of water. Millions of visitors travel from all over the country each year to enjoy all the splendor the lake has to offer, including its more than 1,200 miles of beautiful, wooded shoreline. It’s the ideal spot for boating, camping, hiking, fishing, and so much more.
When my husband and I started boating there several years ago, we quickly learned that the lake collects debris from its vast shoreline and carries it all out into the water. This happens primarily at the start of each season as the water begins to rise. I used to get annoyed because it seemed like there was just so much debris and wood to dodge around in the waters. I’ve since learned to appreciate this special time at the lake to discover the beauty that lay within its waters, like this treasure.

I saw the tip of a branch bobbing in the water one day. When we pulled it out of the water, it was like an iceberg —all the mass, intricacies, and beauty hidden under water and unseen. I had no idea what I would do with this piece or how to do it, but I knew I had to have it. So on to the boat and home with us it went.
The First Step
I have no idea how long this driftwood was floating in the water or how long it was just hanging around the shoreline. That meant it needed a good cleaning. For smaller, more manageable pieces, soaking in a tub of bleach is best. However, this monster piece of wood wasn’t going to fit in any tub.
Pressure cleaning was the best alternative. Using a 1,500 psi cleaner and some bleach in a spray container, I cleaned every nook and cranny of the driftwood. It took a while, but so worth it to get all the crud off.
After a good bath, I let the driftwood dry out … for more than a year. That length of time isn’t necessary unless you’re easily sidetracked and doing a hundred other things like me. So, yes, after a year, I was finally ready to start this project and make a thing of beauty with this driftwood.
Making It Level
I decided to make a coffee table, mostly because it was so large and because I needed one. The piece was uneven and, as a first step, I needed to figure out how it was going to lay and get it level. Easier said than done for sure.
With the help of my husband and his sister’s boyfriend, we flipped the driftwood on every angle to determine which was best for use as a table. And, of course, there was a lot of discussions and opinions shared until we all agreed it was best to leave it lay flat on the largest wood area. Doing so, meant we had to cut the varying branches in a way that would ensure a glass top could sit level on it. A regular level, measuring tape, or good old fashion eyeballing it wasn’t going to work. The only — and absolute best — best choice for a project like this is to use a laser level.

There are many choices when it comes to laser levels; however, I recommend using one like the Bosch Self-Leveling Laser Level. It has a mounting device and rotating neck, as well as flexibility to lay flat on a surface while measuring. Its bright, accurate lines are also important, especially when using as guides to make your cuts.
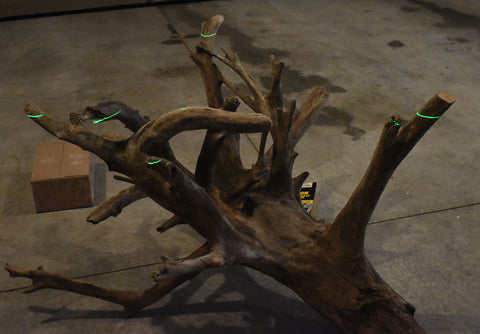
As you can see by this image, we didn’t need to take a lot off the branches; however, we did have some trimming to do. We also had to lose the long branch on the lower left side. We learned quickly that taking small cuts is the best approach, as the balance of the driftwood shifted with each trim. Cut. Measure. Discuss. Cut. Measure again. Discuss again. In the end, what I thought was going to take 30 minutes, took us more than four hours to complete. The result was perfect, though. The driftwood took shape, set evenly on the floor, and was starting to look like a table base.
Balancing the Color

Once we leveled everything out, the next step was to sand it down and even out the color. If you notice in some of the picks, there were varying colors on the driftwood ranging from light to dark. I used a 3M 80 Grit Sanding Block over the entire driftwood, putting more pressure on the darker areas.
I was surprised at how easily the driftwood sanded down to an even color. This process didn’t take long; however, I did notice that the wood was still rough and porous in some areas. To protect the driftwood from moisture and ensure a smooth surface, I decided to use a sanding sealer. I chose to use Rust-Oleum Sanding Sealer.

This stuff was easy enough to use and foolproof. I applied a coat on the entire driftwood using a paint brush. It went on as a milky color, which meant I could easily track my work. When I finished coating the entire piece, the table looked terrible and not so natural. The thought of scrapping the coffee table idea and just throwing the wood in the garden for décor did cross my mind. Luckily, I didn’t have to go this route because the terrible color was only temporary until the sealer dried.

Making It Shine
While staining is always an option for driftwood, I choose not to go this route, I really wanted to have the natural wood colors and beauty of the wood to stand out. Plus, for the life of me, I couldn’t decide what color I’d want this ginormous piece of wood to be. The decision, then, was natural using only a clear finish.
I chose a wipe-on polyurethane finish from Minwax. Best. Stuff. Ever. I’ve used polyurethane lots of times and for lots of things, and it’s never been this easy.

I used a rag and wiped the poly on. After four hours, I wiped on another coat. No brush strokes, unevenness, or dripping to worry about. Smooth sailing and smooth finish. If you’ve never used wipe-on poly, I highly recommend you try it on your next project.
When all was done, I put a glass top on my new table. And here’s the final result.


It looks fantastic in the living room, though it is admittedly larger than your normal coffee table. It’s probably the largest coffee table I’ve ever seen, making it as unique as the driftwood itself. I love it. And I’m thankful for the beautiful waters of Cumberland Lake for bestowing it.
Driftwood is used to make décor of all types, like tables, lamps, sculptures, candleholders, mantels, and the list goes on and on. These beautiful, unique, and eco-friendly accents aren’t just for nautical themes décor or beach houses either. They fit well in just about any interior design.
I have two smaller pieces I found on the lake that I’m going to fix up. I’ll be sure to share those pics when they’re done.
I’m off to my next project. Until then, enjoy.


2 comments
Mendy Champagne
Beautiful coffee table!!! You are so talented!!! Thank you for sharing!!!
Mendy Champagne
Beautiful coffee table!!! You are so talented!!! Thank you for sharing!!!